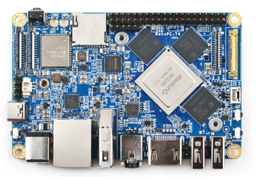
NixOS on ARM/NanoPC-T4
The NanoPC-T4 is a single board computer built around the Rockchip RK3399 SoC.
| NanoPC-T4 | |
|---|---|

| |
| Manufacturer | FriendlyElec |
| Architecture | AArch64 |
| Bootloader | u-boot with ARM trusted boot and Rockchip Miniloader |
| Boot order | official: eMMC |
| Maintainer | tmountain |
Status
The board boots NixOS from eMMC and will also load NixOS via its integrated microSD reader.
The official documentation, which is comprehensive, can be found on the FriendlyElec wiki.
U-Boot for this board is not entirely open, incorporating a binary blob for the tertiary program loader (TPL). Compilation instructions are featured in section 15.7 of the FriendlyElec wiki, and a build target is also provided in upstream u-boot (nanopc-t4-rk3399_defconfig).
Pre-built u-boot images are available here.
Board Specific Installation Notes
Installation onto eMMC
These instructions assume that you have booted the NanoPC-T4 via an OS loaded via its microSD card. A recent Armbian boot image should flash and boot cleanly (follow their docs).
The NanoPC-T4 reserves space for u-boot at the beginning of its eMMC and/or microSD. As a result, successful image installation relies upon a custom partitioning scheme.
# dd if=/dev/zero of=/dev/mmcblk2 bs=1M count=32

# fdisk /dev/mmcblk2
Command (m for help): g
Created a new GPT disklabel (GUID: 2E750097-829F-614C-AD9E-271DA3413E3E).
Command (m for help): n
Partition number (1-128, default 1):
First sector (2048-30535646, default 2048): 32768
Last sector, +/-sectors or +/-size{K,M,G,T,P} (32768-30535646, default 30535646):
Created a new partition 1 of type 'Linux filesystem' and of size 14.6 GiB.
Command (m for help): w

# Make the filesystem
# mkfs.ext4 /dev/mmcblk2p1
# set the disk label (crucially important)
# tune2fs -L NIXOS_SD /dev/mmcblk2p1
After partitioning, you can write the u-boot images as follows.
# dd if=idbloader.bin of=/dev/mmcblk2 seek=64 conv=notrunc
# dd if=uboot.img of=/dev/mmcblk2 seek=16384 conv=notrunc
# dd if=trust.bin of=/dev/mmcblk2 seek=24576 conv=notrunc
Boot and RootFS
The latest linux kernel is working with this board. Instead of building the image yourself you can fetch the latest sd-image from hydra and dd the created images onto the separate partitions. You can find recent successful builds here.
# get the latest link directly from hydra
wget wget https://hydra.nixos.org/build/135139819/download/1/nixos-sd-image-20.09.2623.97a13fb97fc-aarch64-linux.img.zst -O sd.img.zst
# unzstd sd.img.zst
# udisksctl loop-setup -f sd.img -r

# copy the root filesystem to the partition you created earlier
# mkdir eemc imgroot
# mount /dev/mmcblk2p1 eemc
# mount /dev/loop0p2 imgroot
# cd imgroot
# tar cf - . | (cd ../eemc && tar xvf -)
# sync
# cd .. && umount eemc imgroot
After writing the filesystem, shutdown the system completely (power off state), remove the SD card, power it back up, and if everything went well, it should boot into Nix via eMMC.
Bypassing eMMC to boot SD
From a fully powered off state, hold the Boot button and then long-press the power button to power up the board. Continue holding the Boot button for ~5 seconds, and the board will be forced to enter the MASKROM mode which bypasses the eMMC MBR.
UART
The base images are configured to boot up with a serial TTY ( RX/TX UART ) @ 115200 Baud. I had to replace console=ttyS0,115200n8 with console=ttyS2,115200n8 in /boot/extlinux/extlinux.conf to make the serial console work.
Note: the NanoPC-T4 UART defaults to the Debug UART Pin Spec which is adjacent to the USB-C port and is not part of the 40 Pin GPIO Pin Spec (see the aforementioned wiki).
TODO
Add info on making integrated wifi work after booting into Nix.