
Install NixOS on Hetzner Cloud: Difference between revisions
(add some library references) |
Oldhomemovie (talk | contribs) (Expand installing NixOS on Hetzner Cloud via nixos-anywhere / using minimal ISO) |
||
| Line 10: | Line 10: | ||
=== From NixOS minimal ISO === | === From NixOS minimal ISO === | ||
# Create a | The tutorial assumes you already have an account on Hetzner Cloud, and no prior access to a system with NixOS or nix CLI utility installed: | ||
# | # Create a temp folder for future use. Run:<syntaxhighlight lang="shell"> | ||
# Open the remote | mkdir /tmp/my-first-flake | ||
# | </syntaxhighlight>'''Note''': this folder will be mounted into docker container on the next step. Having the folder on the host system enables editing files using a familiar editor, available on the host system, such as VS Code or neovim. | ||
# | #Enter docker container. Run:<syntaxhighlight lang="shell"> | ||
# | docker run --rm --interactive --tty --mount type=bind,source=/tmp/my-first-flake,target=/tmp/my-first-flake alpine:3.20 ash | ||
</syntaxhighlight>'''Note''': this is done in a container in order to reduce the "setup footprint and residue", allowing to throw away this setup environment quickly. | |||
#Install <code>nix</code> and <code>hcloud</code> CLI utilities. Run:<syntaxhighlight lang="shell"> | |||
apk add nix hcloud openssh-client | |||
</syntaxhighlight> | |||
#Authenticate <code>hcloud</code> CLI utility. Run:<syntaxhighlight lang="shell"> | |||
hcloud context create my-first-context | |||
</syntaxhighlight> | |||
#When asked, enter value of the token in the prompt. '''Note''': the token with "Read/Write" permissions can be obtained on a project page inside Hetzner Cloud: <nowiki>https://console.hetzner.cloud/projects/0000000/security/tokens</nowiki> | |||
#Create a VM on Hetzner. Run:<syntaxhighlight lang="shell"> | |||
hcloud server create --name my-hetzner-vm --type cpx21 --image ubuntu-24.04 --location fsn1 --start-after-create=false | |||
</syntaxhighlight>'''Note 1''': this tutorial uses <code>cpx21</code> VM instance type which corresponds to an x86 architecture marchine with 3 CPU cores and 4GB of RAM, and <code>fsn1</code> location which corresponds to a data center in the city of Falkenstein in Germany. A list of all instance types can be obtained by running command <code>hcloud server-type list</code>, while a list of all locations can be obtained by running <code>hcloud location list</code> command. '''Note 2''': Hopefully, Hetzner Cloud team will support NixOS disk images soon, see [https://www.reddit.com/r/NixOS/comments/1desdbv/could_we_convince_hetzner_to_add_nixos_as_a/ Could we convince Hetzner to add Nixos as a standard image choice]. | |||
#Attach an ISO with NixOS installer. Run:<syntaxhighlight lang="shell"> | |||
hcloud server attach-iso my-hetzner-vm nixos-minimal-24.05.1503.752c634c09ce-aarch64-linux.iso | |||
</syntaxhighlight>'''Note''': Hetzner attempts to keep the image as up-to-date as possible, hence the hash of the nixos-minimal image at the time of following this tutorial is highly likely to have changed. Run <code>hcloud iso list</code> and look up an up-to-date name of the nixos-minimal ISO image. | |||
#Start a VM. Run:<syntaxhighlight lang="shell"> | |||
hcloud server poweron my-hetzner-vm | |||
</syntaxhighlight> | |||
# Open Hetzner Cloud console web page, find the <code>my-hetzner-vm</code> server, open a remote web terminal (aka "VNC over "wss://") and change password of <code>nixos</code> user to <code>my-temp-password-123</code>: [[File:Prompt with a token.png|frameless|464x464px]] | |||
# On your host computer, create a folder. Run:<syntaxhighlight lang="shell"> | |||
mkdir -p /tmp/my-first-flake/my-systems/my-hetzner-vm/ | |||
</syntaxhighlight> | |||
#Using a code editor on your host computer, create 4 files. File contents, as well as the location of where to put corresponding file are indicated below:<syntaxhighlight lang="nix"> | |||
# /tmp/my-first-flake/my-systems/my-hetzner-vm/hardware-configuration.nix | |||
{ config, lib, pkgs, modulesPath, ... }: | |||
{ | |||
imports = [ | |||
(modulesPath + "/profiles/qemu-guest.nix") | |||
]; | |||
boot.initrd.availableKernelModules = [ "ahci" "xhci_pci" "virtio_pci" "virtio_scsi" "sd_mod" "sr_mod" ]; | |||
boot.initrd.kernelModules = [ ]; | |||
boot.kernelModules = [ ]; | |||
boot.extraModulePackages = [ ]; | |||
swapDevices = [ ]; | |||
networking.useDHCP = lib.mkDefault true; | |||
nixpkgs.hostPlatform = lib.mkDefault "x86_64-linux"; | |||
} | |||
</syntaxhighlight><syntaxhighlight lang="nix"> | |||
# /tmp/my-first-flake/my-systems/my-hetzner-vm/disko-config.nix | |||
{ | |||
disko.devices = { | |||
disk = { | |||
main = { | |||
type = "disk"; | |||
device = "/dev/sda"; | |||
content = { | |||
type = "gpt"; | |||
partitions = { | |||
boot = { | |||
size = "1M"; | |||
type = "EF02"; | |||
priority = 1; | |||
}; | |||
ESP = { | |||
size = "512M"; | |||
type = "EF00"; | |||
content = { | |||
type = "filesystem"; | |||
format = "vfat"; | |||
mountpoint = "/boot"; | |||
}; | |||
}; | |||
root = { | |||
size = "100%"; | |||
content = { | |||
type = "filesystem"; | |||
format = "ext4"; | |||
mountpoint = "/"; | |||
}; | |||
}; | |||
}; | |||
}; | |||
}; | |||
}; | |||
}; | |||
} | |||
</syntaxhighlight><syntaxhighlight lang="nix"> | |||
# /tmp/my-first-flake/my-systems/my-hetzner-vm/configuration.nix | |||
{ config, lib, pkgs, ... }: | |||
{ | |||
imports = | |||
[ | |||
./hardware-configuration.nix | |||
./disko-config.nix | |||
]; | |||
boot.loader.grub.enable = true; | |||
services.openssh.enable = true; | |||
users.users.eugene = { | |||
isNormalUser = true; | |||
extraGroups = [ "wheel" ]; | |||
initialHashedPassword = "$y$j9T$2DyEjQxPoIjTkt8zCoWl.0$3mHxH.fqkCgu53xa0vannyu4Cue3Q7xL4CrUhMxREKC"; # Password.123 | |||
}; | |||
programs.neovim = { | |||
enable = true; | |||
defaultEditor = true; | |||
configure = { | |||
customRC = '' | |||
colorscheme base16-ashes | |||
''; | |||
packages.packages = { | |||
start = [ | |||
pkgs.vimPlugins.nvim-base16 | |||
]; | |||
}; | |||
}; | |||
}; | |||
system.stateVersion = "24.05"; | |||
} | |||
</syntaxhighlight>'''Note''': the value of <code>initialHashedPassword</code> was obtained using <code>mkpasswd</code> command in Linux, and corresponds to <code>Password.123</code> string used as password.<syntaxhighlight lang="nix"> | |||
# /tmp/my-first-flake/flake.nix | |||
{ | |||
inputs = { | |||
nixpkgs = { | |||
url = "github:NixOS/nixpkgs/nixos-24.05"; | |||
}; | |||
disko = { | |||
url = "github:nix-community/disko"; | |||
inputs = { | |||
nixpkgs = { | |||
follows = "nixpkgs"; | |||
}; | |||
}; | |||
}; | |||
}; | |||
outputs = inputs@{ self, nixpkgs, ... }: { | |||
nixosConfigurations = { | |||
my-hetzner-vm = nixpkgs.lib.nixosSystem { | |||
system = "x86_64-linux"; | |||
modules = [ | |||
./my-systems/my-hetzner-vm/configuration.nix | |||
inputs.disko.nixosModules.disko | |||
]; | |||
}; | |||
}; | |||
}; | |||
} | |||
</syntaxhighlight>'''Note''': all these files constitute what's known as a ''nix [[flake]]''. The flake in question is small, though not exactly a minimal one. | |||
#Get the service IP address. Run:<syntaxhighlight lang="shell"> | |||
hcloud server ip my-hetzner-vm | |||
</syntaxhighlight> | |||
#Build NixOS from flake. Run:<syntaxhighlight lang="shell"> | |||
nix run --extra-experimental-features 'nix-command flakes' github:nix-community/nixos-anywhere -- --flake /tmp/my-first-flake#my-hetzner-vm nixos@0.0.0.0 --build-on-remote | |||
</syntaxhighlight>'''Note''': replace <code>0.0.0.0</code> with an IP address obtained during the previous step. | |||
#Detach ISO from VM. Run:<syntaxhighlight lang="shell"> | |||
hcloud server detach-iso my-hetzner-vm | |||
</syntaxhighlight> | |||
#Reboot VM. Run:<syntaxhighlight lang="shell"> | |||
hcloud server reboot my-hetzner-vm | |||
</syntaxhighlight> | |||
The NixOS on Hetzner is installed! Let's do a few more steps to customize the installation. | |||
#First, "forget" existing key fingerprint for the Hetzner host. Run:<syntaxhighlight lang="shell"> | |||
ssh-keygen -f /root/.ssh/known_hosts -R 0.0.0.0 | |||
</syntaxhighlight>'''Note''': again, here and below, replace <code>0.0.0.0</code> with an IP address obtained via <code>hcloud server ip my-hetzner-vm</code>. | |||
#Copy flake files onto the server. Run:<syntaxhighlight lang="shell"> | |||
scp -r /tmp/my-first-flake eugene@0.0.0.0:~/ | |||
</syntaxhighlight> | |||
#Using <code>neovim</code> editor on the VM, modify <code>configuration.nix</code> to include a package containing Elixir programming language runtime for <code>eugene</code> user. Run:<syntaxhighlight lang="shell"> | |||
nvim my-first-flake/my-vms/my-hetzner-vm/configuration.nix | |||
</syntaxhighlight>Edit the <code>configuration.nix</code> so that <code>users</code> block looks like this:<syntaxhighlight lang="shell"> | |||
# ~/my-first-flake/my-vms/my-hetzner-vm/configuration.nix | |||
# ... | |||
users.users.eugene = { | |||
isNormalUser = true; | |||
extraGroups = [ "wheel" ]; | |||
initialHashedPassword = "$y$j9T$2DyEjQxPoIjTkt8zCoWl.0$3mHxH.fqkCgu53xa0vannyu4Cue3Q7xL4CrUhMxREKC"; # Password.123 | |||
packages = [ | |||
pkgs.beam.packages.erlang_26.elixir_1_16 | |||
]; | |||
}; | |||
# ... | |||
</syntaxhighlight> | |||
#Re-build NixOS. Run:<syntaxhighlight lang="shell"> | |||
sudo nixos-rebuild switch --flake ./my-first-flake#my-hetzner-vm | |||
</syntaxhighlight> | |||
=== disko === | === disko === | ||
Revision as of 21:09, 26 June 2024
Hetzner Cloud in 2023 offers amd64 instances on both Intel and AMD hardware, as well as arm64 instanced based on the Ampere Altra Q80, in three locations in Europe, as well as two in America.
The pricing of the arm64 instances is generally considered very competitive, compared to similarly specced amd64 instances.
Installation
There are several ways to install NixOS, such as the "traditional" ISO installation, nixos-infect or nixos-anywhere.
From NixOS minimal ISO
The tutorial assumes you already have an account on Hetzner Cloud, and no prior access to a system with NixOS or nix CLI utility installed:
- Create a temp folder for future use. Run:Note: this folder will be mounted into docker container on the next step. Having the folder on the host system enables editing files using a familiar editor, available on the host system, such as VS Code or neovim.
mkdir /tmp/my-first-flake - Enter docker container. Run:Note: this is done in a container in order to reduce the "setup footprint and residue", allowing to throw away this setup environment quickly.
docker run --rm --interactive --tty --mount type=bind,source=/tmp/my-first-flake,target=/tmp/my-first-flake alpine:3.20 ash
- Install
nixandhcloudCLI utilities. Run:apk add nix hcloud openssh-client
- Authenticate
hcloudCLI utility. Run:hcloud context create my-first-context
- When asked, enter value of the token in the prompt. Note: the token with "Read/Write" permissions can be obtained on a project page inside Hetzner Cloud: https://console.hetzner.cloud/projects/0000000/security/tokens
- Create a VM on Hetzner. Run:Note 1: this tutorial uses
hcloud server create --name my-hetzner-vm --type cpx21 --image ubuntu-24.04 --location fsn1 --start-after-create=false
cpx21VM instance type which corresponds to an x86 architecture marchine with 3 CPU cores and 4GB of RAM, andfsn1location which corresponds to a data center in the city of Falkenstein in Germany. A list of all instance types can be obtained by running commandhcloud server-type list, while a list of all locations can be obtained by runninghcloud location listcommand. Note 2: Hopefully, Hetzner Cloud team will support NixOS disk images soon, see Could we convince Hetzner to add Nixos as a standard image choice. - Attach an ISO with NixOS installer. Run:Note: Hetzner attempts to keep the image as up-to-date as possible, hence the hash of the nixos-minimal image at the time of following this tutorial is highly likely to have changed. Run
hcloud server attach-iso my-hetzner-vm nixos-minimal-24.05.1503.752c634c09ce-aarch64-linux.iso
hcloud iso listand look up an up-to-date name of the nixos-minimal ISO image. - Start a VM. Run:
hcloud server poweron my-hetzner-vm
- Open Hetzner Cloud console web page, find the
my-hetzner-vmserver, open a remote web terminal (aka "VNC over "wss://") and change password ofnixosuser tomy-temp-password-123: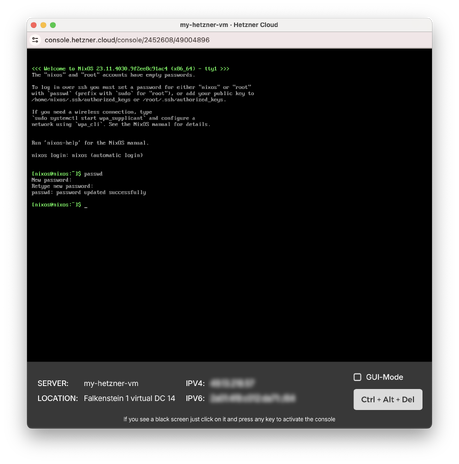
- On your host computer, create a folder. Run:
mkdir -p /tmp/my-first-flake/my-systems/my-hetzner-vm/
- Using a code editor on your host computer, create 4 files. File contents, as well as the location of where to put corresponding file are indicated below:
# /tmp/my-first-flake/my-systems/my-hetzner-vm/hardware-configuration.nix

{ config, lib, pkgs, modulesPath, ... }:

{
  imports = [
    (modulesPath + "/profiles/qemu-guest.nix")
  ];

  boot.initrd.availableKernelModules = [ "ahci" "xhci_pci" "virtio_pci" "virtio_scsi" "sd_mod" "sr_mod" ];
  boot.initrd.kernelModules = [ ];
  boot.kernelModules = [ ];
  boot.extraModulePackages = [ ];
  swapDevices = [ ];
  networking.useDHCP = lib.mkDefault true;
  nixpkgs.hostPlatform = lib.mkDefault "x86_64-linux";
}
# /tmp/my-first-flake/my-systems/my-hetzner-vm/disko-config.nix

{
  disko.devices = {
    disk = {
      main = {
        type = "disk";
        device = "/dev/sda";
        content = {
          type = "gpt";
          partitions = {
            boot = {
              size = "1M";
              type = "EF02";
              priority = 1;
            };
            ESP = {
              size = "512M";
              type = "EF00";
              content = {
                type = "filesystem";
                format = "vfat";
                mountpoint = "/boot";
              };
            };
            root = {
              size = "100%";
              content = {
                type = "filesystem";
                format = "ext4";
                mountpoint = "/";
              };
            };
          };
        };
      };
    };
  };
}
Note: the value of# /tmp/my-first-flake/my-systems/my-hetzner-vm/configuration.nix { config, lib, pkgs, ... }: { imports = [ ./hardware-configuration.nix ./disko-config.nix ]; boot.loader.grub.enable = true; services.openssh.enable = true; users.users.eugene = { isNormalUser = true; extraGroups = [ "wheel" ]; initialHashedPassword = "$y$j9T$2DyEjQxPoIjTkt8zCoWl.0$3mHxH.fqkCgu53xa0vannyu4Cue3Q7xL4CrUhMxREKC"; # Password.123 }; programs.neovim = { enable = true; defaultEditor = true; configure = { customRC = '' colorscheme base16-ashes ''; packages.packages = { start = [ pkgs.vimPlugins.nvim-base16 ]; }; }; }; system.stateVersion = "24.05"; }
initialHashedPasswordwas obtained usingmkpasswdcommand in Linux, and corresponds toPassword.123string used as password.Note: all these files constitute what's known as a nix flake. The flake in question is small, though not exactly a minimal one.# /tmp/my-first-flake/flake.nix { inputs = { nixpkgs = { url = "github:NixOS/nixpkgs/nixos-24.05"; }; disko = { url = "github:nix-community/disko"; inputs = { nixpkgs = { follows = "nixpkgs"; }; }; }; }; outputs = inputs@{ self, nixpkgs, ... }: { nixosConfigurations = { my-hetzner-vm = nixpkgs.lib.nixosSystem { system = "x86_64-linux"; modules = [ ./my-systems/my-hetzner-vm/configuration.nix inputs.disko.nixosModules.disko ]; }; }; }; }
- Get the service IP address. Run:
hcloud server ip my-hetzner-vm
- Build NixOS from flake. Run:Note: replace
nix run --extra-experimental-features 'nix-command flakes' github:nix-community/nixos-anywhere -- --flake /tmp/my-first-flake#my-hetzner-vm nixos@0.0.0.0 --build-on-remote
0.0.0.0with an IP address obtained during the previous step. - Detach ISO from VM. Run:
hcloud server detach-iso my-hetzner-vm
- Reboot VM. Run:
hcloud server reboot my-hetzner-vm

The NixOS on Hetzner is installed! Let's do a few more steps to customize the installation.
- First, "forget" existing key fingerprint for the Hetzner host. Run:Note: again, here and below, replace
ssh-keygen -f /root/.ssh/known_hosts -R 0.0.0.0
0.0.0.0with an IP address obtained viahcloud server ip my-hetzner-vm. - Copy flake files onto the server. Run:
scp -r /tmp/my-first-flake eugene@0.0.0.0:~/
- Using
neovimeditor on the VM, modifyconfiguration.nixto include a package containing Elixir programming language runtime foreugeneuser. Run:Edit thenvim my-first-flake/my-vms/my-hetzner-vm/configuration.nixconfiguration.nixso thatusersblock looks like this:# ~/my-first-flake/my-vms/my-hetzner-vm/configuration.nix # ... users.users.eugene = { isNormalUser = true; extraGroups = [ "wheel" ]; initialHashedPassword = "$y$j9T$2DyEjQxPoIjTkt8zCoWl.0$3mHxH.fqkCgu53xa0vannyu4Cue3Q7xL4CrUhMxREKC"; # Password.123 packages = [ pkgs.beam.packages.erlang_26.elixir_1_16 ]; }; # ...
- Re-build NixOS. Run:
sudo nixos-rebuild switch --flake ./my-first-flake#my-hetzner-vm
disko
TODO: it would be neat to document how to boot from the NixOS ISO and create the machine based on an online description including https://github.com/nix-community/disko specs - should be a quick way to set up bespoke 'throwaway' machines.
references:
nixos-infect
Beside the manual installation, one way to setup NixOS is to replace an existing installation, for example the latest Ubuntu image, with nixos-infect.
Cloud-init
You don't even need to log into the Ubuntu image, you can run nixos-infect from the 'could-init' as documented at https://github.com/elitak/nixos-infect/tree/master#hetzner-cloud
Manually
- Boot into the existing operating system, preferably Ubuntu or Debian
- Login as root or with root permissions
- Deploy your SSH public key for the current root user. This key will be used later for authentication into the NixOS system.
- Run following script. Replace
NIX_CHANNELvariable with the version string you wish to install.
curl https://raw.githubusercontent.com/elitak/nixos-infect/master/nixos-infect | NIX_CHANNEL=nixos-22.11 bash -x
- Reboot into NixOS
Declarative
Network configuration
Hetzner Cloud offers both IPv4 (/32 subnet) and IPv6 (/64 subnet) connectivity to each machine. The assigned addresses can be looked up on the Hetzner Cloud Console from the "Networking" tab on the instance details. The public IPv4 address of the server can automatically obtained be via DHCP. For IPv6 you have to statically configure both address and gateway.
  systemd.network.enable = true;
  systemd.network.networks."30-wan" = {
    matchConfig.Name = "ens3"; # either ens3 (amd64) or enp1s0 (arm64)
    networkConfig.DHCP = "ipv4";
    address = [
      # replace this subnet with the one assigned to your instance
      "2a01:4f8:aaaa:bbbb::1/64"
    ];
    routes = [ { routeConfig.Gateway = "fe80::1"; } ];
  };
Static IPv4 configuration
The IPv4 address can also be configured statically. The trick here is, that the gateway needs to be configured with the onlink flag, because it is not in the same subnet as your public IP address, but still very much on that same link.
  systemd.network.networks."30-wan" = {
    matchConfig.Name = "ens3"; # either ens3 (amd64) or enp1s0 (arm64)
    networkConfig.DHCP = "no";
    address = [
      # replace this address with the one assigned to your instance
      "A.B.C.D/32"
      # replace this subnet with the one assigned to your instance
      "2a01:4f8:AAAA:BBBB::1/64"
    ];
    routes = [ {
      routeConfig = { Gateway = "172.31.1.1"; GatewayOnLink = true; }; }
      { routeConfig.Gateway = "fe80::1"; }
    ];
  };
AArch64 (CAX instance type) specifics
If the screen goes blank after selecting the boot option in the bootloader, the following snippet makes sure that GPU drivers are available in initrd, and the correct device gets used for the serial console:
boot.initrd.kernelModules = [ "virtio_gpu" ];
boot.kernelParams = [ "console=tty" ];