NixOS on RISCV/VisionFive 2: Difference between revisions
Add note on how to update firmware |
→Setup: Update and fix btrfs image instruction |
||
| (33 intermediate revisions by 6 users not shown) | |||
| Line 30: | Line 30: | ||
The [https://github.com/starfive-tech/VisionFive2 VisionFive 2] is a single board computer (SBC) that uses a RISC-V processor with an integrated GPU. It supports Linux operating system and various multimedia features, such as 4K video decoding and OpenGL ES 3.212. | The [https://github.com/starfive-tech/VisionFive2 VisionFive 2] is a single board computer (SBC) that uses a RISC-V processor with an integrated GPU. It supports Linux operating system and various multimedia features, such as 4K video decoding and OpenGL ES 3.212. | ||
= | == Status == | ||
See https://rvspace.org/en/project/JH7110_Upstream_Plan for an overview of which features are already supported by the latest mainline kernel used by NixOS. | |||
Please note that HDMI display patches haven't been merged yet. | |||
= Setup = | |||
Precompiled SD-card images with unstable NixOS can be found [https://hydra.ztier.in/job/nixos/nixos-unstable/sd-image-riscv64-new-kernel-no-zfs-installer-cross/latest on misuzu's Hydra instance]. Before flashing the image, use <code>unzstd</code> to unpack the downloaded archive. | |||
=== Manually build a SD-card image === | |||
First create this [[Flake]] file | |||
{{file|flake.nix|nix|<nowiki> | {{file|flake.nix|nix|<nowiki> | ||
{ | { | ||
inputs.nixpkgs.url = " | inputs.nixpkgs.url = "nixpkgs/nixos-25.11"; | ||
inputs.nixos-hardware.url = "github:nixos/nixos-hardware"; | inputs.nixos-hardware.url = "github:nixos/nixos-hardware"; | ||
| Line 65: | Line 72: | ||
# Additional configuration goes here | # Additional configuration goes here | ||
sdImage.compressImage = false; | sdImage.compressImage = false; | ||
| Line 78: | Line 80: | ||
}; | }; | ||
system.stateVersion = " | system.stateVersion = "25.11"; | ||
}; | }; | ||
inherit system; | inherit system; | ||
| Line 85: | Line 87: | ||
} | } | ||
</nowiki>}} | </nowiki>}} | ||
If you want to use an alternative filesystem for system root, for example [[Btrfs]], you could change the <code>sdImage</code>-part to this | |||
{{file|flake.nix|nix|<nowiki> | |||
sdImage = { | |||
compressImage = false; | |||
rootFilesystemCreator = "${pkgs.path}/nixos/lib/make-btrfs-fs.nix"; | |||
# do this manually as replacing the resize2fs string in postBootCommands | |||
# might be too complex. btrfs uses its own resize command. | |||
expandOnBoot = false; | |||
}; | |||
nixpkgs.overlays = [ | |||
(final: prev: { | |||
ubootVisionFive2 = prev.ubootVisionFive2.overrideAttrs (oldAttrs: { | |||
extraConfig = (oldAttrs.extraConfig or "") + '' | |||
CONFIG_FS_BTRFS=y | |||
CONFIG_CMD_BTRFS=y | |||
''; | |||
}); | |||
}) | |||
]; | |||
fileSystems."/" = { | |||
fsType = lib.mkForce "btrfs"; | |||
options = [ | |||
"compress=zstd" | |||
"noatime" | |||
"rw" | |||
]; | |||
}; | |||
</nowiki>}} | |||
It might be helpful to add [[RISC-V#Binary cache|third-party binary cache configuration]] to this system configuration. | |||
Run following command to build the SD-card image | Run following command to build the SD-card image | ||
| Line 92: | Line 128: | ||
</syntaxhighlight> | </syntaxhighlight> | ||
After successfull build, flash the resulting file in the directory <code>results/sd-image</code> to the target device | === Flashing the image === | ||
After successfull build or unpack, flash the resulting file (build file is in the directory <code>results/sd-image</code>) to the target device such as a NVME SSD or in this example the SD-card (<code>/dev/mmcblk*</code>). Note that everything on the target device gets erased. | |||
<syntaxhighlight lang="bash"> | <syntaxhighlight lang="bash"> | ||
| Line 100: | Line 137: | ||
= Usage = | = Usage = | ||
First enable booting from SD-card by | The board has "boot mode pins", from which we can control what device should be booted from. | ||
[[File: | |||
[[File:Visionfive2 uart wiring.jpg|none|thumb]]Update board firmware<syntaxhighlight lang="bash"> | See official documentation https://doc-en.rvspace.org/VisionFive2/Quick_Start_Guide/VisionFive2_SDK_QSG/boot_mode_settings.html . | ||
First enable booting from SD-card or NVME SSD by setting jumper 1 and 2 to "FLASH/QSPI mode" (both QSPI and SDIO mode support booting from an SD card): | |||
[[File:Visionfive_2_jumper_config_sdcard_boot.jpg|border|frameless|803x803px]] | |||
For UART access, wire GND (black), RX (blue) and TX (purple) to your adapter | |||
[[File:Visionfive2 uart wiring.jpg|none|thumb|802x802px]]Update board firmware<syntaxhighlight lang="bash"> | |||
sudo visionfive2-firmware-update-flash | sudo visionfive2-firmware-update-flash | ||
</syntaxhighlight>Bootstrap NixOS system configuration at <code>/etc/nixos/configuration.nix</code><syntaxhighlight lang="bash"> | </syntaxhighlight>Bootstrap NixOS system configuration at <code>/etc/nixos/configuration.nix</code><syntaxhighlight lang="bash"> | ||
nixos-generate-config | nixos-generate-config | ||
</syntaxhighlight> | </syntaxhighlight>It is recommended to [[RISC-V#Binary cache|configure third-party binary caches]] to speed up build times. | ||
== Tips and tricks == | |||
=== Using the Visionfive 2 as a remote builder to build native RISCV packages for e.g. the Visionfive 2 === | |||
Building an NixOS system image that can be flashed to an SD card or NVMe SSD requires to '''build RISCV binaries''', more specifically for the <code>"riscv64-linux"</code>platform. From a typical Intel/AMD computer we can either | |||
* '''emulated native compile using QEMU''' virtualization by enabling the binfmt kernel feature on NixOS configuration setting <code>boot.binfmt.emulatedSystems = [ "riscv64-linux" ];</code>). This can be fast if everything is downloaded pre-compiled from the cache.nixos.org cache (not supported yet though) and only few packages really need local compilation. In reality it can be extremely slow, e.g. compiling a Linux kernel alone can take days. | |||
* '''cross-compile''' to RISCV from another (e.g. "x86_64-linux) machine using the setup in the example above. However very few packages will be cached from cache.nixos.org as cross-compiled packages are less likely to be pre-build than native compiled. So the compile itself is fast but there will be a lot more to compile locally. In practice this can be quite fragile, because you may encounter packages that don't really support cross-compilation get stuck. | |||
* '''native compile on an remote builder''' like the Visionfive 2 itself running its custom Debian Linux at the beginning or later NixOS. This is quite simple to setup and reasonably fast as most packages can be pre-build and cached on cache.nixos.org, and building a remaining Linux kernel only takes 3h on the Visionfive 2. | |||
'''Setting up the Visionfive 2 as a remote native builder''' can be done following the steps at [[Distributed build|https://wiki.nixos.org/wiki/Distributed_build]]. The rough steps are as follows: | |||
# '''Install the Nix package manager''' on Visionfive 2 Debian OS the normal, multi-user way with <code>sh <(curl -L <nowiki>https://nixos.org/nix/install</nowiki>) --daemon</code>. If you already have NixOS running on the Visionfive 2, then you can skip this step. | |||
# '''Setup a <code>ssh</code> connection''' from your local machine to the Visionfive 2, especially adding <code>SetEnv PATH=/nix/var/nix/profiles/default/bin:/usr/local/sbin:/usr/local/bin:/usr/sbin:/usr/bin:/sbin:/bin</code> to the Pi's <code>/etc/ssh/sshd_config</code> file. If you already have NixOS running on the Visionfive 2, then you can skip this step. | |||
# '''Make the remote Visionfive 2 known to you local computer''' by adding it as a <code>nix.buildMachines</code> entry to your <code>/etc/nix/configuration.nix</code> file and use connection protocol <code>ssh-ng</code>(!). | |||
# You can then '''build, e.g. an NixOS sd card image''' with a call similar to <code>nix build .\#nixosConfigurations.visionfive2.config.system.build.sdImage</code> | |||
# '''flash that resulting image onto an SD card''' or NVMe SSD using a call similar to <code>zstdcat result/sd-image/nixos-sd-image-23.11.20230703.ea4c80b-riscv64-linux.img.zst | sudo dd of=/dev/mmcblk0 bs=100M status=progress</code> and place that card into the Visionfive 2. | |||
=== Deploy and Update the Visionfive 2 NixOS system once it's running NixOS === | |||
Once the Visionfive 2 is running NixOS, you can update it with newer NixOS system configurations using e.g. the usual <code>nix-rebuild</code> | |||
tool with a call similar to | |||
<code>nixos-rebuild --flake .#visionfive2 --build-host user@visionfive2 --target-host user@visionfive2 --use-remote-sudo switch</code> | |||
that uses the SSH connection from the remote builder section. | |||
See [https://nixcademy.com/2023/08/10/nixos-rebuild-remote-deployment/ this guide] for a good explanation of this terminal call. | |||
== See also == | |||
* There's also a port of the UEFI reference implementation EDK2 available at https://github.com/starfive-tech/edk2 to support a future generic RISCV Linux image that can be booted from any RISCV device. | |||
Latest revision as of 13:17, 12 January 2026
| VisionFive 2 | |
|---|---|

| |
| Manufacturer | StarFive |
| Architecture | RISC-V |
| Bootloader | Custom or UEFI |
| Boot order | Configurable; SD, USB, Netboot |
| Maintainer | onny |
| VisionFive 2 | |
| SoC | JH7110 |
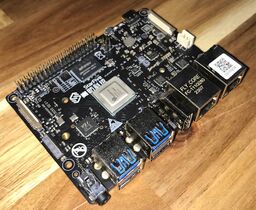
The VisionFive 2 is a single board computer (SBC) that uses a RISC-V processor with an integrated GPU. It supports Linux operating system and various multimedia features, such as 4K video decoding and OpenGL ES 3.212.
Status
See https://rvspace.org/en/project/JH7110_Upstream_Plan for an overview of which features are already supported by the latest mainline kernel used by NixOS.
Please note that HDMI display patches haven't been merged yet.
Setup
Precompiled SD-card images with unstable NixOS can be found on misuzu's Hydra instance. Before flashing the image, use unzstd to unpack the downloaded archive.
Manually build a SD-card image
First create this Flake file
{
  inputs.nixpkgs.url = "nixpkgs/nixos-25.11";
  inputs.nixos-hardware.url = "github:nixos/nixos-hardware";

  # Some dependencies of this flake are not yet available on non linux systems
  inputs.systems.url = "github:nix-systems/x86_64-linux";
  inputs.flake-utils.url = "github:numtide/flake-utils";
  inputs.flake-utils.inputs.systems.follows = "systems";

  outputs = { self, nixpkgs, nixos-hardware, flake-utils, ... }:
    flake-utils.lib.eachDefaultSystem (system:
      rec {
        packages.default = packages.sd-image;
        packages.sd-image = (import "${nixpkgs}/nixos" {
          configuration =
            { config, ... }: {
              imports = [
                "${nixos-hardware}/starfive/visionfive/v2/sd-image-installer.nix"
              ];

              # If you want to use ssh set a password
              users.users.nixos.password = "test123";
              # OR add your public ssh key
              # users.users.nixos.openssh.authorizedKeys.keys = [ "ssh-rsa ..." ];

              # AND configure networking
              networking.interfaces.end0.useDHCP = true;
              networking.interfaces.end1.useDHCP = true;

              # Additional configuration goes here

              sdImage.compressImage = false;

              nixpkgs.crossSystem = {
                config = "riscv64-unknown-linux-gnu";
                system = "riscv64-linux";
              };

              system.stateVersion = "25.11";
            };
          inherit system;
        }).config.system.build.sdImage;
      });
}
If you want to use an alternative filesystem for system root, for example Btrfs, you could change the sdImage-part to this
sdImage = {
  compressImage = false;
  rootFilesystemCreator = "${pkgs.path}/nixos/lib/make-btrfs-fs.nix";
  # do this manually as replacing the resize2fs string in postBootCommands
  # might be too complex. btrfs uses its own resize command.
  expandOnBoot = false;
};

nixpkgs.overlays = [
  (final: prev: {
    ubootVisionFive2 = prev.ubootVisionFive2.overrideAttrs (oldAttrs: {
      extraConfig = (oldAttrs.extraConfig or "") + ''
        CONFIG_FS_BTRFS=y
        CONFIG_CMD_BTRFS=y
      '';
    });
  })
];

fileSystems."/" = {
  fsType = lib.mkForce "btrfs";
  options = [
    "compress=zstd"
    "noatime"
    "rw"
  ];
};
It might be helpful to add third-party binary cache configuration to this system configuration.
Run following command to build the SD-card image
nix build .#
Flashing the image
After successfull build or unpack, flash the resulting file (build file is in the directory results/sd-image) to the target device such as a NVME SSD or in this example the SD-card (/dev/mmcblk*). Note that everything on the target device gets erased.
dd if=result/sd-image/nixos-sd-image-23.11pre-git-riscv64-linux-starfive-visionfive2.img of=/dev/mmcblk0 status=progress
Usage
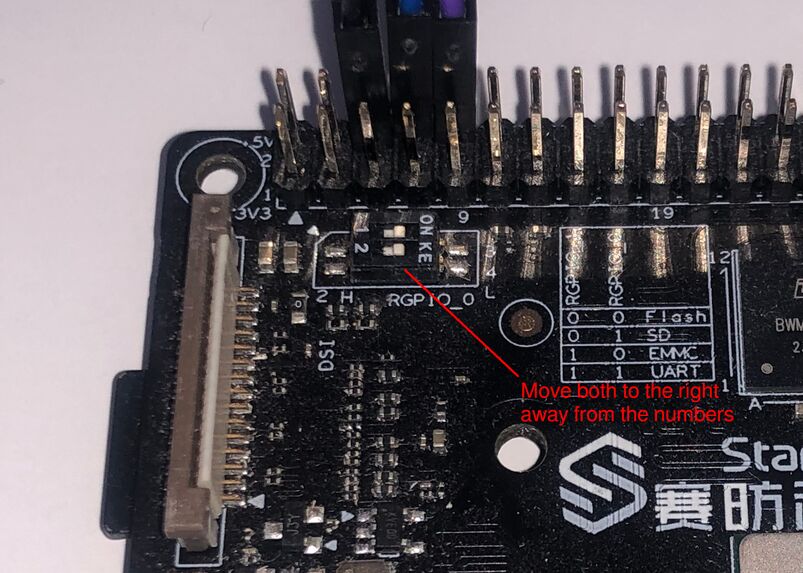
The board has "boot mode pins", from which we can control what device should be booted from.
See official documentation https://doc-en.rvspace.org/VisionFive2/Quick_Start_Guide/VisionFive2_SDK_QSG/boot_mode_settings.html .
First enable booting from SD-card or NVME SSD by setting jumper 1 and 2 to "FLASH/QSPI mode" (both QSPI and SDIO mode support booting from an SD card):
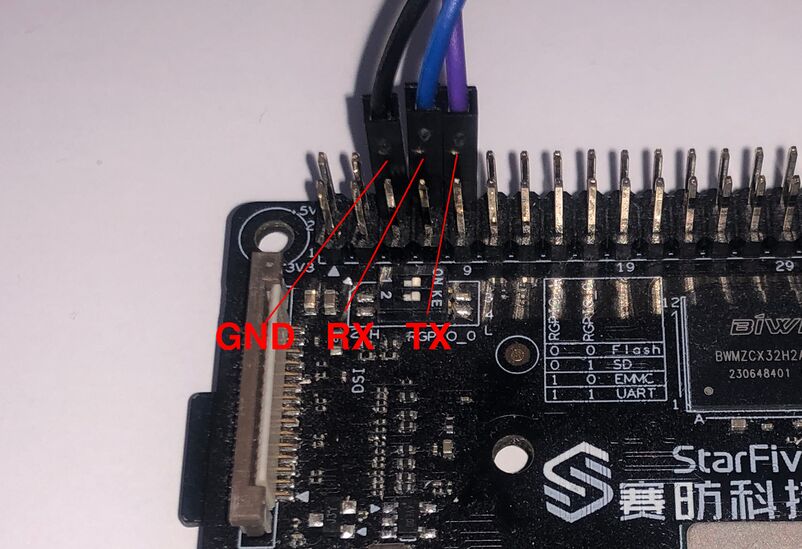
For UART access, wire GND (black), RX (blue) and TX (purple) to your adapter

Update board firmware
sudo visionfive2-firmware-update-flash
Bootstrap NixOS system configuration at /etc/nixos/configuration.nix
nixos-generate-config
It is recommended to configure third-party binary caches to speed up build times.
Tips and tricks
Using the Visionfive 2 as a remote builder to build native RISCV packages for e.g. the Visionfive 2
Building an NixOS system image that can be flashed to an SD card or NVMe SSD requires to build RISCV binaries, more specifically for the "riscv64-linux"platform. From a typical Intel/AMD computer we can either
- emulated native compile using QEMU virtualization by enabling the binfmt kernel feature on NixOS configuration setting
boot.binfmt.emulatedSystems = [ "riscv64-linux" ];). This can be fast if everything is downloaded pre-compiled from the cache.nixos.org cache (not supported yet though) and only few packages really need local compilation. In reality it can be extremely slow, e.g. compiling a Linux kernel alone can take days. - cross-compile to RISCV from another (e.g. "x86_64-linux) machine using the setup in the example above. However very few packages will be cached from cache.nixos.org as cross-compiled packages are less likely to be pre-build than native compiled. So the compile itself is fast but there will be a lot more to compile locally. In practice this can be quite fragile, because you may encounter packages that don't really support cross-compilation get stuck.
- native compile on an remote builder like the Visionfive 2 itself running its custom Debian Linux at the beginning or later NixOS. This is quite simple to setup and reasonably fast as most packages can be pre-build and cached on cache.nixos.org, and building a remaining Linux kernel only takes 3h on the Visionfive 2.
Setting up the Visionfive 2 as a remote native builder can be done following the steps at https://wiki.nixos.org/wiki/Distributed_build. The rough steps are as follows:
- Install the Nix package manager on Visionfive 2 Debian OS the normal, multi-user way with
sh <(curl -L https://nixos.org/nix/install) --daemon. If you already have NixOS running on the Visionfive 2, then you can skip this step. - Setup a
sshconnection from your local machine to the Visionfive 2, especially addingSetEnv PATH=/nix/var/nix/profiles/default/bin:/usr/local/sbin:/usr/local/bin:/usr/sbin:/usr/bin:/sbin:/binto the Pi's/etc/ssh/sshd_configfile. If you already have NixOS running on the Visionfive 2, then you can skip this step. - Make the remote Visionfive 2 known to you local computer by adding it as a
nix.buildMachinesentry to your/etc/nix/configuration.nixfile and use connection protocolssh-ng(!). - You can then build, e.g. an NixOS sd card image with a call similar to
nix build .\#nixosConfigurations.visionfive2.config.system.build.sdImage - flash that resulting image onto an SD card or NVMe SSD using a call similar to
zstdcat result/sd-image/nixos-sd-image-23.11.20230703.ea4c80b-riscv64-linux.img.zst | sudo dd of=/dev/mmcblk0 bs=100M status=progressand place that card into the Visionfive 2.
Deploy and Update the Visionfive 2 NixOS system once it's running NixOS
Once the Visionfive 2 is running NixOS, you can update it with newer NixOS system configurations using e.g. the usual nix-rebuild
tool with a call similar to
nixos-rebuild --flake .#visionfive2 --build-host user@visionfive2 --target-host user@visionfive2 --use-remote-sudo switch
that uses the SSH connection from the remote builder section.
See this guide for a good explanation of this terminal call.
See also
- There's also a port of the UEFI reference implementation EDK2 available at https://github.com/starfive-tech/edk2 to support a future generic RISCV Linux image that can be booted from any RISCV device.

