NixOS on RISCV/VisionFive 2
| VisionFive 2 | |
|---|---|

| |
| Manufacturer | StarFive |
| Architecture | RISC-V |
| Bootloader | Custom or UEFI |
| Boot order | Configurable; SD, USB, Netboot |
| Maintainer | onny |
| VisionFive 2 | |
| SoC | JH7110 |
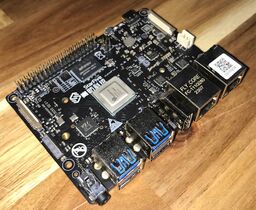
The VisionFive 2 is a single board computer (SBC) that uses a RISC-V processor with an integrated GPU. It supports Linux operating system and various multimedia features, such as 4K video decoding and OpenGL ES 3.212.
Status
The Visionfive 2 developers have pushed their Linux kernel patches quite early to the upstream mainline kernel and have gotten almost all merged already.
See https://rvspace.org/en/project/JH7110_Upstream_Plan for an overview of what device is supported in which Linux kernel version.
NixOS (more precisely nixpkgs) already has the generic Linux kernel 6.9 available, which supports almost everything you need out of the box (for a server as HDMI display patches haven't been merged into 6.9). This means NixOS should be able to run without a custom kernel.
Building a SD-card image
This example assumes you have the latest revision of the board (v1.3) with 8GB memory. For other configurations please consult the nixos-hardware documentation on this board. First create this Flake file
{
  inputs.nixpkgs.url = "github:nixos/nixpkgs/nixos-23.11";
  inputs.nixos-hardware.url = "github:nixos/nixos-hardware";

  # Some dependencies of this flake are not yet available on non linux systems
  inputs.systems.url = "github:nix-systems/x86_64-linux";
  inputs.flake-utils.url = "github:numtide/flake-utils";
  inputs.flake-utils.inputs.systems.follows = "systems";

  outputs = { self, nixpkgs, nixos-hardware, flake-utils, ... }:
    flake-utils.lib.eachDefaultSystem (system:
      rec {
        packages.default = packages.sd-image;
        packages.sd-image = (import "${nixpkgs}/nixos" {
          configuration =
            { config, ... }: {
              imports = [
                "${nixos-hardware}/starfive/visionfive/v2/sd-image-installer.nix"
              ];

              # If you want to use ssh set a password
              users.users.nixos.password = "test123";
              # OR add your public ssh key
              # users.users.nixos.openssh.authorizedKeys.keys = [ "ssh-rsa ..." ];

              # AND configure networking
              networking.interfaces.end0.useDHCP = true;
              networking.interfaces.end1.useDHCP = true;

              # Additional configuration goes here

              hardware.deviceTree.overlays = [{
                name = "8GB-patch";
                dtsFile = "${nixos-hardware}/starfive/visionfive/v2/8gb-patch.dts";
              }];

              sdImage.compressImage = false;

              nixpkgs.crossSystem = {
                config = "riscv64-unknown-linux-gnu";
                system = "riscv64-linux";
              };

              system.stateVersion = "23.11";
            };
          inherit system;
        }).config.system.build.sdImage;
      });
}
Run following command to build the SD-card image
nix build .#
After successfull build, flash the resulting file in the directory results/sd-image to the target device, in this example the SD-card (/dev/mmcblk*). Note that everything on the target device gets erased.
dd if=result/sd-image/nixos-sd-image-23.11pre-git-riscv64-linux-starfive-visionfive2.img of=/dev/mmcblk0 status=progress
Usage
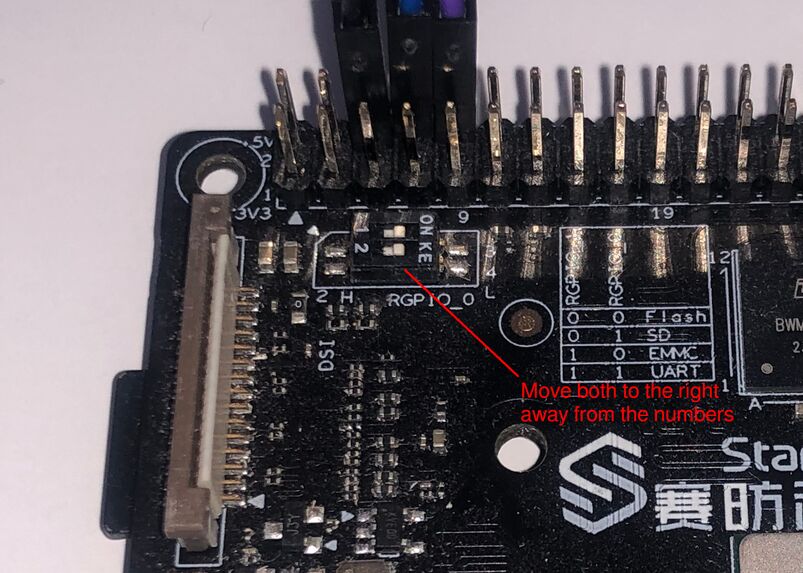
The board has "boot mode pins", from which we can control what device should be booted from.
See official documentation https://doc-en.rvspace.org/VisionFive2/Quick_Start_Guide/VisionFive2_SDK_QSG/boot_mode_settings.html .
First enable booting from SD-card by setting jumper 1 and 2 to "FLASH/QSPI mode" (both QSPI and SDIO mode support booting from an SD card):
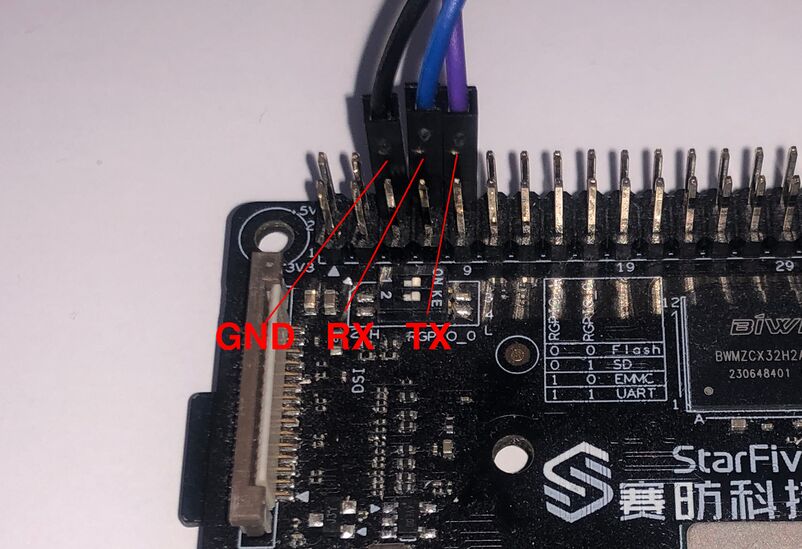
For UART access, wire GND (black), RX (blue) and TX (purple) to your adapter

Update board firmware
Update board firmware
sudo visionfive2-firmware-update-flash
Bootstrap NixOS system configuration at /etc/nixos/configuration.nix
nixos-generate-config

