
SCION
SCION (Scalability, Control, and Isolation On Next-Generation Networks) is a modern Future Internet architecture that aims to offer high availability and efficient point-to-point packet delivery, even in the presence of actively malicious network operators and devices. As of 2018 it is an ongoing research project led by researchers at ETH Zurich and, among other Future Internet proposals, is being explored in the Internet Engineering Task Force research group for path-aware networking.[1]
Usage Tips
Users of scion ping and other SCION applications must be in the scion group in order to access the dispatcher socket in /run/shm/dispatcher/default.sock. You can add users to the SCION group in your NixOS configuration as follows
{
  users.users.matthew.extraGroups = [ "scion" ];
}
The scion-apps are not included by default even when services.scion.enable = true. You can add them to your NixOS configuration as follows
{ pkgs, ... }:
{
  environment.systemPackages = [ pkgs.scion-apps ];
}
Connecting to SCIONLab
SCIONLab is a global research network to test the SCION next-generation internet architecture.[2] and allows you to connect to a pre-existing network without bootstrapping your own cryptographic material or Isolation Domain as a non-core AS (Autonomous System). Once you have configured a non-core AS on your LAN, other hosts on this LAN can then use it to connect to the broader SCIONLab network, without having to run the scion-control or scion-router daemons. A SCION end-host only requires the scion-dispatcher and scion-daemon services. In a future release of SCION, the dispatcher will be deprecated and this requirement is reduced to only a single daemon. [3]
To connect to SCIONLab:
1. Create an account at https://www.scionlab.org/registration/register/
2. Create a new AS at https://www.scionlab.org/user/as/add
3. Fill out the following form, making sure to select SCION installation from sources

4. Click Create AS
5. Once your AS is created, you should be able to click Download configuration on the page. This will yield a tarball like scion_lab_user@myemail.com_20-ffaa_1_1155.tar.gz Inside is a folder named gen which contains the necessary information we need to connect to the SCIONLab test network.
Fixing SCIONLab Provided topology.json
The SCIONLab generated configuration contains some default incorrect assumptions though, that we need to either accomodate or fix. Inside of the gen folder provided by SCIONLab, you can correct the topology.json by removing -1 from all occurrences of br-1 cs-1 ds-1 and sig-1, then you can use the NixOS configuration below with no changes.
For convenience, you can run sed -i 's/-1//g' gen/*/topology.json to do this replacement.
{
  services = {
    scion = {
      enable = true; # Enable all SCION daemons
      bypassBootstrapWarning = true; # We do not need to generate keys to attach to SCIONLab
    };
  };

  # Pass the SCIONLab generated configuration into `/etc/scion` where the daemons will read from
  environment = {
    etc = {
      "scion/topology.json".source = ./gen/ASffaa_1_1155/topology.json;
      "scion/certs".source = ./gen/ASffaa_1_1155/certs;
      "scion/keys".source = ./gen/ASffaa_1_1155/keys;
      "scion/crypto".source = ./gen/ASffaa_1_1155/crypto;
    };
  };
}
Accomodating SCIONLab Provided topology.json
Alternatively, if you wish to accomodate SCIONLab's default topology naming assumptions, you can modify the identifiers in each instance of the SCION daemons, and avoid modifying the supplied `topology.json`
{
  services = {
    scion = {
      enable = true; # Enable all SCION daemons
      bypassBootstrapWarning = true; # We do not need to generate keys to attach to SCIONLab

      # Correct the identifiers to accomodate SCIONLab provided topology.json
      scion-control.settings.general = { id = "cs-1"; };
      scion-daemon.settings.general = { id = "sd-1"; };
      scion-router.settings.general = { id = "br-1"; };
    };
  };

  # Pass the SCIONLab generated configuration into `/etc/scion` where the daemons will read from
  environment = {
    etc = {
      "scion/topology.json".source = ./gen/ASffaa_1_1155/topology.json;
      "scion/certs".source = ./gen/ASffaa_1_1155/certs;
      "scion/keys".source = ./gen/ASffaa_1_1155/keys;
      "scion/crypto".source = ./gen/ASffaa_1_1155/crypto;
    };
  };
}
Checking that everything worked
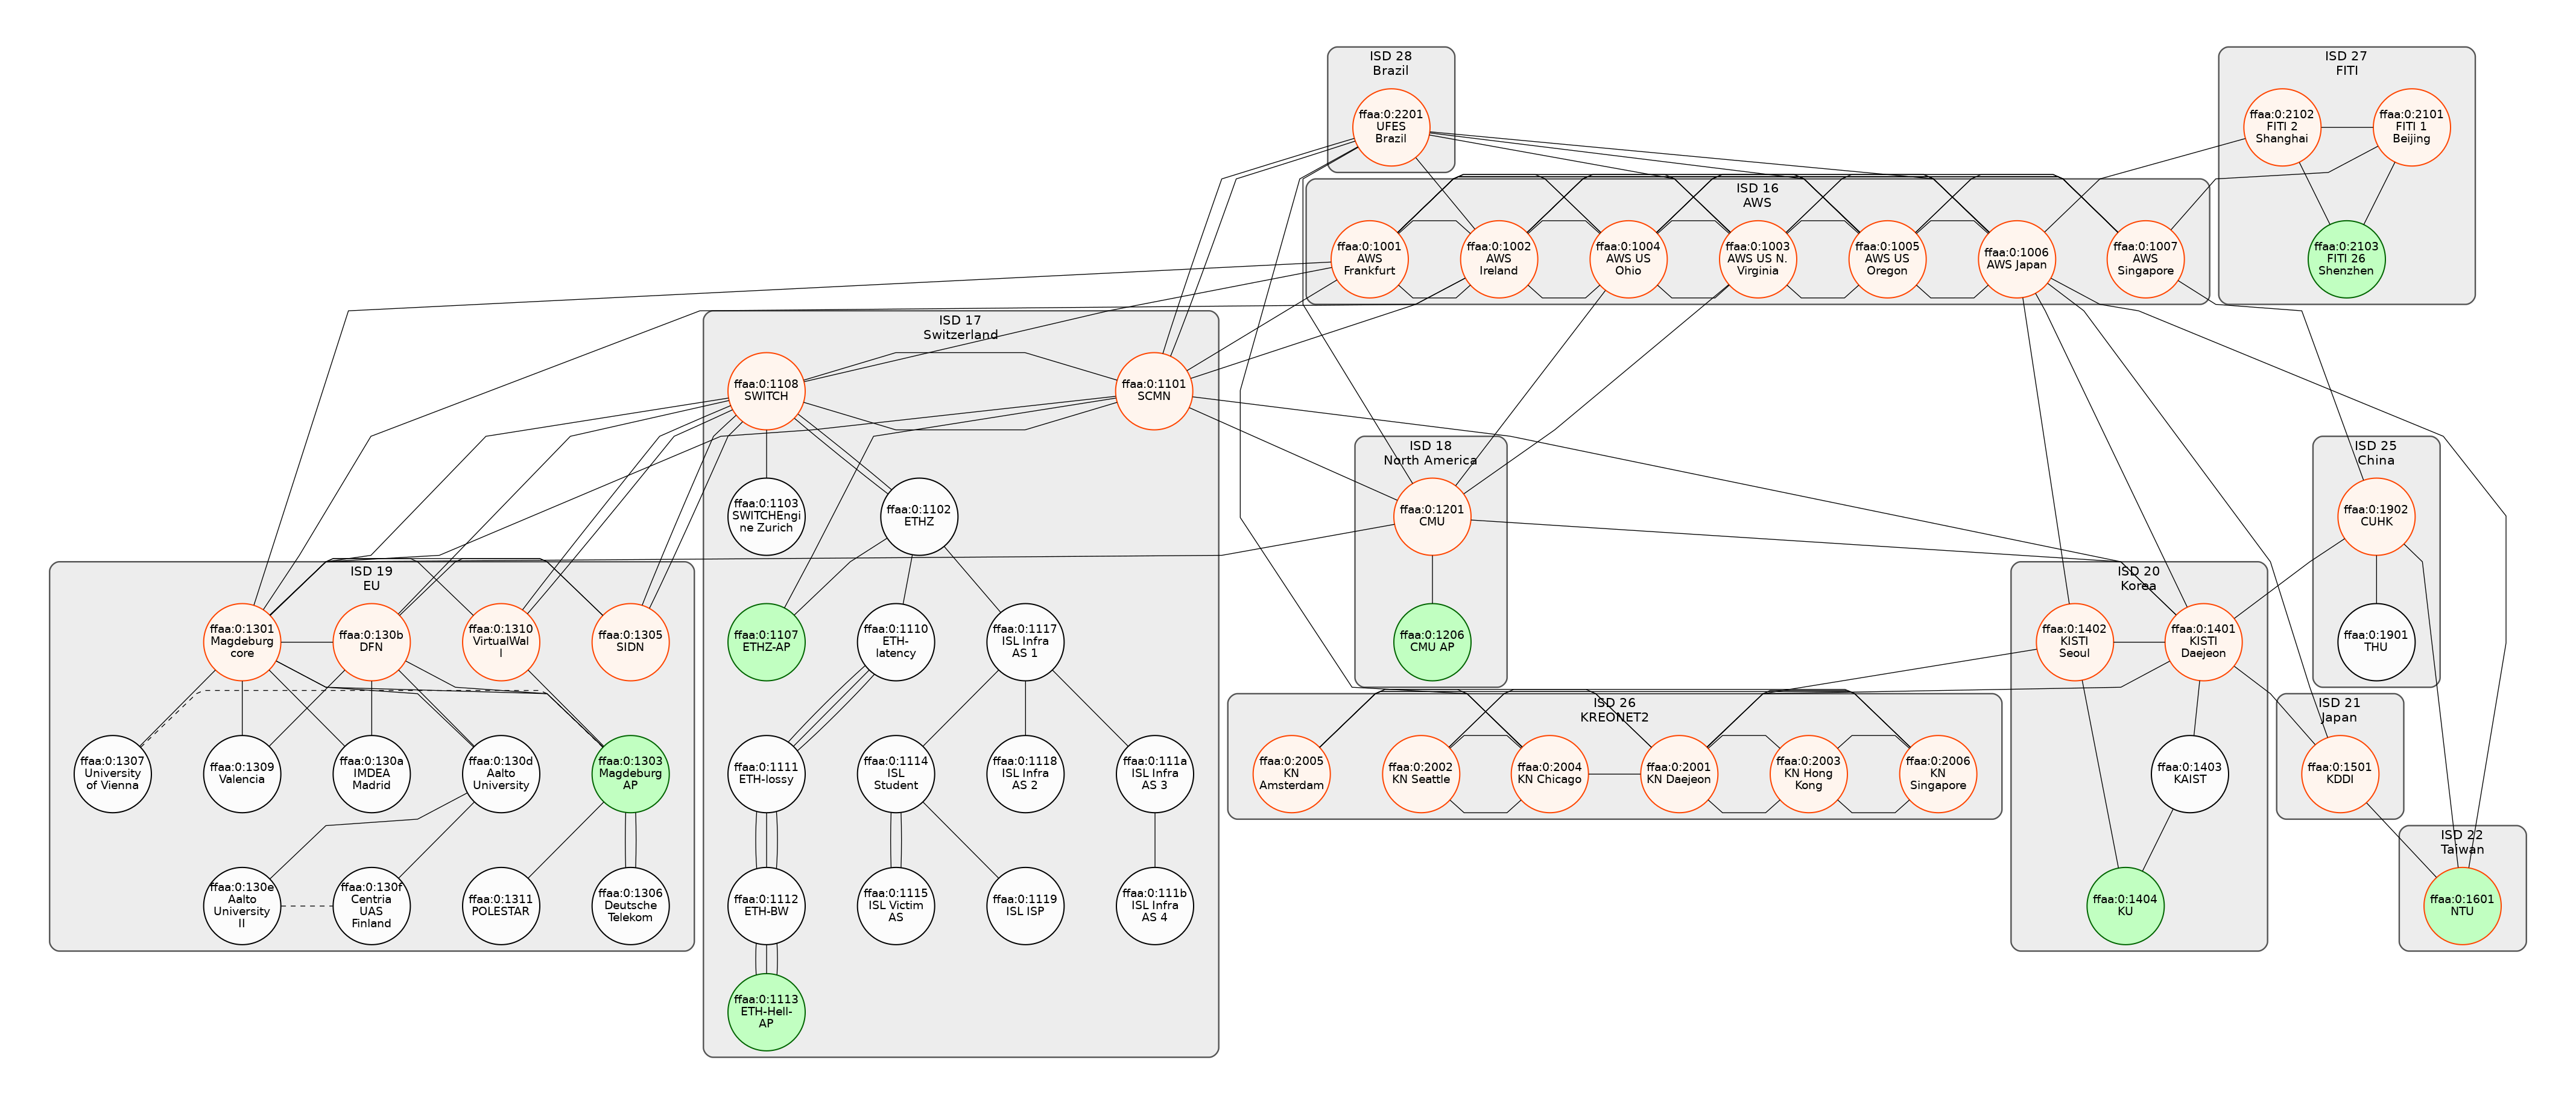
Once connected to SCIONLab, you should be able to ping one of the core AS from https://www.scionlab.org/topology.png, as below
$ scion ping 17-ffaa:0:1107,127.0.0.1
Resolved local address:
  127.0.0.1
Using path:
  Hops: [17-ffaa:1:1155 1>573 17-ffaa:0:1107] MTU: 1472 NextHop: 127.0.0.1:30001

PING 17-ffaa:0:1107,127.0.0.1:0 pld=0B scion_pkt=80B
88 bytes from 17-ffaa:0:1107,127.0.0.1: scmp_seq=0 time=36.799ms
^C
--- 17-ffaa:0:1107,127.0.0.1 statistics ---
1 packets transmitted, 1 received, 0% packet loss, time 423.698ms
rtt min/avg/max/mdev = 36.799/36.799/36.799/0.000 ms
Additionally, you can try using the scion-apps as described in the upstream documentation https://docs.scionlab.org/content/apps/.